Here at Hosting Australia our developers have noticed a concerning trend.
We are seeing more and more incidences of WordPress websites being hacked or compromised in someway.
Unfortunately, we are seeing one common theme. Inevitably, access to website has been made possible through the lack of security implemented by iether the website’s developer or owner.
Listed in this article are 5 of the top ways reasons your website is vulnerable.
If any of the following apply to your website, please make sure you fix them ASAP. It’s just not worth putting your business at risk!
1. Not updating WordPress
If there’s one commonality among WordPress hack victims, it’s this:
Not updating WordPress!
According to Sucuri’s Hacked Website Report, somewhere between 55-61% of WordPress hack victims were running out-of-date WordPress when they got infected, and that’s definitely not a coincidence:
| City | Q1 2016 | Q2 2016 | Q3 2016 |
|---|---|---|---|
| WordPress | 56% | 55% | 61% |
| Joomla | 85% | 86% | 84% |
| Magento | 97% | 96% | 94% |
| Drupal | 81% | 84% | 86% |
(Charts by Visualizer Lite.)
From reflection on the sites that we see being compromised we see 3 times of people who don’t update their WordPress installs.
- People who put off updates because they’re too busy or forget, OR
- People who are afraid that updating their site will break it, OR
- People who have no idea that their website needs updates or how to do it.
If you belong in group 1, then stop procrastinating already! – it just takes a few seconds to update your site.
If you belong in the group 2, you can take some steps to ensure nothing breaks your site.
Always make a full and complete backup of your site before you run an update.
In the unlikely event that your site does crash, you can easily roll back the previous version.
If you are in group 3? Then we are here to help! Open a support ticket by emailing support@hosting-australia.com or contact your developer and ask about updating your site.
2. Not updating plugins
See this as the same as updating your WordPress install. It is just as important, if not more so, to update the plugins that you use in your site.
If you use outdated plugins and do not update them, you are exposing yourself to potential security issues and bugs…
Again, Sucuri’s study has some helpful data – 18% of WordPress hack victims were hacked just because they hadn’t updated plugins with known vulnerabilities. The plugin developer knew there was a problem and fixed it – people just didn’t update the plugin to secure their site!
| Plugins | Share |
|---|---|
| RevSlider | 0.46 |
| GravityForms | 0.22 |
| TimThumb | 0.32 |
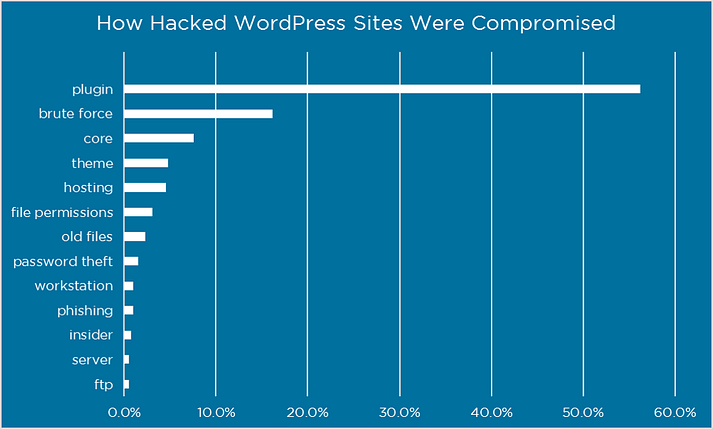
Additionally, in a survey of WordPress hack victims from Wordfence, over 55% of people who knew how the hacker got in said it was because of a plugin issue.
If you’ve got a ton of plugins and you find it hard to keep track of all the updates, we recommend using Wordfence.
This plugin comes with a malware scanner that will check your other plugins for malware, bad URLs, backdoors, SEO spam, malicious redirects and code injections. It also draws your attention to potential security issues when a plugin you’re using has been closed or abandoned.
3. Not protecting your WordPress admin directory
In that same Wordfence survey, one of the most common WordPress hack attempts involved getting access to your WordPress login credentials, either through brute force attacks or password theft:
To prevent that from happening, you’ll want to protect your WordPress admin directory (your /wp-admin page).
First and foremost, make sure you password protect your WordPress admin page.
By default, you’ll require a password to get into the directory, but we’re talking about adding another layer on top of that.
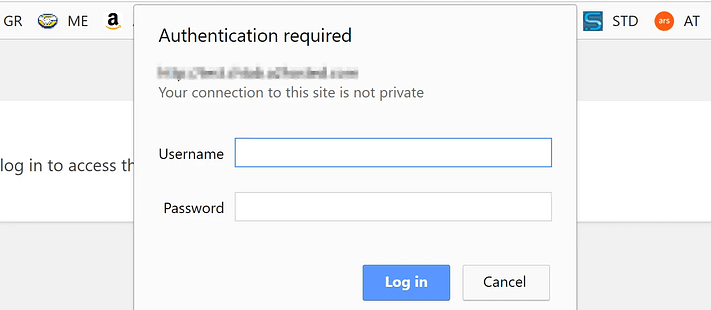
That way, anyone trying to access your WordPress admin will need to provide an extra username and password.
If you need a walkthrough on how to do this, check out Step 2 of our article: 4 Ways to Tighten WordPress Security.
If you don’t like that approach, another good alternative is two-factor authentication.
With two-factor authentication set up, your site users won’t just require a password to log in – they’ll also need to input a code that’s sent to them via text message, email, or an app.
To do this, check out our WordPress two-factor authentication guide.
Last but not least, it’s not a good idea to use “admin” as your WordPress username.
Hackers might attempt to get into your site using this default username, so you should definitely switch it up.
While WordPress doesn’t let you directly change your username, you can still do it by following these methods.
4. Using weak passwords
This one’s pretty obvious – if you use weak passwords, it’s easier for hackers to access your accounts.
We’re not just talking about the password that you use for your WordPress admin account, though.
The same thing applies to your other passwords, including your:
- Web hosting accounts
- FTP accounts
- MySQL database
- Email accounts associated with your WordPress admin account
To learn more about generating a strong password, read How Secure Is My Password? Here’s Your Answer, Plus How to Pick a Strong Password.
Additionally, some hosts (like Kinsta and WP Engine) let you use two-factor authentication for your hosting account. That’s another good layer of security.
5. Using low quality themes
If you do a quick Google search, you’ll find a good handful of websites that distribute paid WordPress themes for free.
At first glance, this might look like a cool money-saver for website owners on a tight budget.
In actuality, though, most of these sites are pretty dodgy…
If you download and install a theme from them, you might end up compromising the security of your website.
Remember, there’s no such thing as a free lunch.
If you want to use a premium theme on your website, then get it from a reputable theme developer website and PAY for it. Or you can check out our free WordPress themes (no hacks here – promise!).
Stop WordPress hack attempts before it’s too late
Sad to say, the average WordPress site owner doesn’t consider security a priority.
When you’re setting up your site for the first time, you’re probably more concerned with the look and feel of your website than anything else.
And once you get your site up and running, you’ll turn your focus to churning out great content, neglecting security as you go along.
Obviously, this is a huge mistake.
You don’t wait to wait for a WordPress hack attempt BEFORE you start caring about your site’s security – when that happens, it’ll be too late.
So set aside an hour or two and make sure that your WordPress site is secure and up-to-date.
Forget analyzing your traffic from Google Analytics or optimizing your pages for SEO — this is the one most important thing you can do for your WordPress site.